×

Happy to Help!

This website doesn't store cookies. Enjoy the experience, without worrying about your data!

Great, thanks!

Monthly Archives: February 2021

  • 0

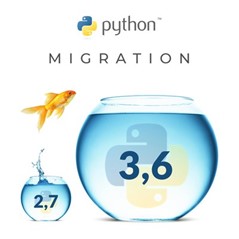
Migration from Python 2.7 to 3.2: Challenges and How to Mitigate Them

Category : Embedded Blog

Embedded application development and C language are closely associated – to the extent of being almost inseparable. Any embedded developer would vouch for C as a coding language that creates reliable and more compact code.

However, the embedded algorithms are evolving and so are their dependencies and coding requirements.

One example may be the migration from regular control loops to the artificial neural network that require more efficient programming capabilities. Such scenarios are opening the way for programming languages that are faster to write, easy-to-read and less prone to errors. One such language that is gaining foothold in the embedded domain is Python.

Migration from Python


We will save the Python vs C/C++ battle for some other day. Anyways there are plenty of articles that have covered this topic in detail.

Our focus for this blog is the migration of Python 2.7 to Python 3.2, which was long pending.

Embedded applications running on Python 2.0 have an added responsibility of migrating to the newer version as Python has finally ended the support for the older version from 1st Jan 2020.

And end of support is not the only reason for migration to Python 3; here are a few value-adds that the new version of Python brings to the table.

  • Python 3.7 adds support for Artificial Intelligence and Machine Learning, two technologies that are shaping the modern automotive applications.
  • The new version has included some powerful tool kits and libraries that would come in handy for faster software development.
  • There are enhanced security measures that Python 2 does not provide.
  • Codes written in Python language can co-exist with other languages; engineers will be able to use C language where required along with Python.
  • Several changes have been made to the syntax that make the code writable.

In the context of embedded applications development, this transition from Python 2.7 to 3.X entails a series of steps. As a matter of fact, Python does not provide an automation tool to aid this transition. Still, there are ways and means to perform this transition.

Let’s take a look at the steps involved in the migration from Python 2.7 to 3.X.


Python 2.7 to 3.X

Migration from Python 2.7 to 3.X: A Bird’s Eye View

The primary focus of the migration from Python 2.7 to 3.X is to preserve the features and ensure that the applications work in the same way as before. This involves changing the implementation from the older version to the newer one.

There are two strategies that can be opted for this migration- Manual which involves re-writing the code, and Automated that makes use of certain tools for this purpose. One of the most important advantages of such migration lies in the opportunity to improve the application design and make it better in multiple aspects.

Easier said than done, migration from Python 2 to 3.X is challenging. There could be some codes that might not be transitioned using tools. Automated testing could miss certain bugs and errors. Let’s examine why this migration is a tough job!

  • Considerable changes in syntax and semantics
  • Lack of mapping between the older and newer versions of Python
  • Cleverly created backports in Python 2 to enhance its longevity
  • Absence of one-stop automation tool that could perform complete migration without manual intervention; instead, there are multiple tools to be used.
  • Some codes need to be rewritten and re-tested despite using automation tools

So how do the engineers achieve this feat? Let’s find out.

The Many Concepts That Help Migrate from Python 2 to Python 3.X

Python boasts of a huge ecosystem of libraries and tools. As we pointed out earlier that there is no one-stop tool for the migration but a collection of tools and packages that aid the migration. For instance, PIP can help install the new Python package. In addition to changing the code, Python runtime also needs to be changed in order to support Python 3 features.

Two packages that aid in the migration are:

  1. Future Package: As the name suggests, Future package is a sort of bridge between Python 2 and 3. It is designed to allow a Python 3.x codebase that works in both python version 2 and 3. There is a script included in the package called ‘futurize’ that helps make the code compatible with both versions of Python.
  2. Six(2×3) Package: The package earns its name by a symbolic multiplication of 2 and 3 as in the Python version 2 and 3. Essentially, it is a compatibility library to wrap over the differences of Python 2 and 3. As Python 2 is completely obsolete now, Six is used more as a tool to move away from version 2.

Python 2 to Python 3 Migration: Changes that Matter

Learning the differences between Python 2 and Python 3: The major changes between Python 2 and 3 are centered around 3 aspects- Syntax, Builtins and Libraries.

Several constructs and statements have been either added, removed, or modified. The built-in functions have also been redesigned. For instance, the old Print statement has been removed and replaced with a Print function. Similarly, division operator has also been modified. In the newer version, division operator gives the option to get either an exact answer or a truncated one.

Python libraries have not only been re-written but also re-organized to a large extent. When the Python 2 code is migrated to Python 3, changes corresponding to these aspects must be considered for the new code to run smoothly. When you get down to the migration process, you will get to know many such differences that need to be accounted for.

Syntax and Type Changes using Future Package: When it comes to syntax changes, the Future package can come in handy. It comprises a few modules that make it possible to start changing Python 2 legacy code. Syntax changes that are possible in the old code include:

Syntax

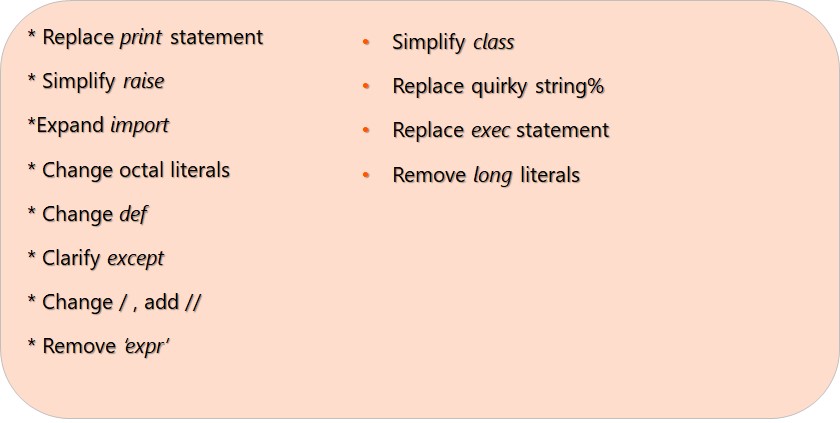
The ones without the start mark need some additional efforts for migration. These must wait until the code is migrated.

Syntax changes are quite visible and can be performed using various tools. The internal type changes are a little challenging as Python 3 has made various changes in the way it sees Unicode characters. For instance, a string in Python 3 is pure text as opposed to the older version. Similarly, numeric types have also undergone certain modifications such as addition of new methods.

Changes in the Built-in functions and standard library: Many new functions have been added to Python while many have been removed or redefined. Using Six package as the bridge, some of these function changes can be made to the old Python code.

The need to change some of the built-in functions emanate from the change of data types that we discussed earlier. The others were just obsolete and were removed or redefined as a housecleaning activity. Most of these functions can be changed using the Six package, a few might require rework after the migration is complete.

With change in data types and functions, the change in standard library is inevitable. Although not huge, most of the changes are limited to mere name changes or addition of a few features.

Now, you know which changes you want to consider while migrating from Python 2 to Python 3.X. Coming to the actual process of migration, they are two ways to do it- Manually and Automated.

In Part-2 of this blog series, we discuss both these strategies and walk you through the migration process. Watch this space.


  • 0

How is Vehicle Diagnostic Test Automation Performed using CANoe Diva Tool

Category : Embedded Blog

UDS (ISO 14229) stands for Unified Diagnostic Service, a name that signifies the unification of different diagnostics standards, viz. KWP 2000, ISO 15765 and a few others. Naturally, UDS specifies a whole list of diagnostic services, PIDs and DTCs required for vehicle diagnostics. These sub-components of the UDS protocol are configured based on the system specification and functionality of the diagnostic applications.

Hence, it goes without saying that the UDS software must be verified after the configuration.  After all, it has a critical task at hand – which is the continuous monitoring of the vehicle ECU’s health.

The testing of diagnostic software implementation in vehicle ECU is quite a task, as this requires enormous time and effort, if performed manually. Imagine creating test cases for every UDS service as per the diagnostic description and executing them manually!

Standardization in the automotive ecosystem along with the support of automation tools come to our rescue in such scenarios.

Let’s understand how.

Initially, diagnostic descriptions were provided by OEMs in formats such as Excel or PDF. The automotive engineers used to create test cases manually based on these descriptions.

Fast forward to the era of ODX and CDD standards, the ECU description files are created in a standardized format that is not unique to any OEM. This is the first step of test automation in vehicle diagnostic implementation.

The second step in this process is performed by the test automation tool that takes ODX file as input and executes the test automatically. One such test automation tool commonly used in vehicle diagnostic testing is CANoeDiva from Vector. It is one among the most preferred diagnostic tools deployed by automotive engineers.

In this blog, we will learn more about vehicle diagnostic implementation testing and how Canoe Diva aids the process.

Understanding the Process of Automated Vehicle Diagnostic Testing

Automated testing in the context of vehicle diagnostics implementation begins with generation of test cases and concludes at test report creation. The processes occurring in between are automated with the help of tools such as Vector’s Canoe Diva. While learning about the process of test automation, we will also cover the role of this tool. Let’s start with the steps involved in the process:

Vector’s Canoe Diva
 

  • Test Case Generation: The first step in the test automation process is the generation of test cases from the diagnostic description in CDD or ODX format. Diagnostic descriptions are the lists of diagnostic services that need to be configured in the application. For instance, in a UDS implementation, the following list of services might be configured in a diagnostic application.
     

    Test Case Generation

     
    For the sake of standardization across different stakeholders in a project, an ODX or a CDD file will be generated with these services. The configurator feature of Canoe Diva tool takes the ODX/CDD file as input and creates the desired test contents. With the help of a user interface, the testing team can configure the test cases. They can also exclude services from test, modify request parameters and so on. Once the configuration is done, the generator tool creates a test module (test cases) with test specification. The test cases are created such that each of the services and related PIDs are evaluated.

  • Test Execution: Once the test module along with the test specification is prepared, the role of CANoe takes center stage. CANoe is a tool that simulates the ECU network communication. The test module that we prepared with the help of Canoe Diva tool is now loaded on to CANoe in an existing network configuration.
     

    CANoe Test Execution

     
    After loading the test cases, the automated test execution can be started with one click.

  • Test Report Generation and Analysis:

    Test reports are generated once the test is over. A detailed result sorted according to different criteria can be retrieved with ease. For instance, a failed category of test results can be analyzed to understand the cause of the failure. Similarly, the warnings, partially passed tests etc. can be analyzed as well for better understanding of the test reports. The error types can be classified under various categories and comments can be added as well.

Specifics of Vehicle Diagnostic Testing & Role of Canoe Diva

The test performed on diagnostic software in vehicle ECU verified both the protocol as well as the diagnostic application. From the protocol format to execution of services and data types, various levels of validations are performed.

Canoe Diva supports the following tests and various other functions during diagnostic test execution:

  • Protocol Validation: As clear from the name, this test is to validate various aspects of the diagnostic protocol such as physical/functional addressing or request processing (both valid and invalid). Value limits and data type are also validated as per the diagnostic specifications.
  • Diagnostic Parameters: Each diagnostic service has certain parameters. At this level of testing, the parameters are compared to expected values, I/O and network signals. The fault memory and the error detection & reporting capabilities of the ECU are also tested. The test is passed only when the error reporting is proven to be according to the protocol and specifications.
  • Software Download: Since flash bootloader is part of almost every ECU, it also needs to be validated in conjunction with the diagnostic software. CANoeDiva works with Vflash, a tool from Vector to configure the flash bootloader, to generate test cases for bootloaders. Some examples of these tests include ECU flashing at instances pertaining to under/over voltage or testing of scenarios when ECU flashing must be aborted.
  • Requirement Mapping: Requirement traceability is a must when you are developing automotive software as it assures that you are building the right product. Canoe Diva tool understands the importance of traceability and hence, supports requirement mapping.

Conclusion

Automotive ECUs have become quite complex with a gamut of interfaces and I/O signals. When one tests a diagnostic software, all the interfaces and signals must be covered and validated.

Test automation makes much sense here, as manual testing would be substantially time-consuming and will also impact the cost.

Tools like Canoe Diva not only automate the vehicle diagnostic testing but also make it fully standardized. Canoe Diva being an OEM-agnostic tool, can be used across the automotive industry and yet, it allows OEM-specific diagnostic configurations. The tool also supports a range of diagnostic protocols such as UDS, ISO 15765 (DoCAN), KWP, J1979, WWH-OBD, KWP and more.


  • 0

Key Standards That Apply to Software and Hardware Development in Automotive Industry

Category : automotive-insights

The automotive industry is quite diverse with several stakeholders in the ecosystem. Although a vehice carries the brand name of an OEM, it is a joint-effort of various entities including the tier-1 suppliers, product engineering companies and after-market suppliers. These stakeholders have their tasks cut out for them.

For instance, an OEM might require an advanced automotive lighting solution for one of their flagship car models. The OEM would delegate this job to a suitable and trustworthy tier-1 supplier. The supplier also might need some protocol stacks, platform software, functional safety compliance, etc. for which they rely on product engineering companies.

Naturally, when components from a range of entities get fitted in a vehicle, some sort of standardization is mandatory. In addition to standardization, ensuring safety, security and complaince is another dimension that the automotive industry must consider.

In order to manage such constraints and future compatibity issues, various organizations and consortiums like ISO, SAE, AUTOSAR, etc. come up with standards. We have compiled a few of the key standards widely used and applied in the automotive industry, in the form of infographics.

Automotive Safety, Security and Hardware Specific Standards

As technology partners to various OEMs and Tier-1 suppliers, we have supported them in the implementation of most of these standards.

A Snapshot of Our Services for ISO 26262 Compliant Functional Safety:

  • Consulting for HARA & Safety Analyses (including FMEA & FMEDA)
  • Gap analysis at technical and functional levels
  • Software coding and design implementation as per ISO 26262 Guidelines
  • Static and Dynamic Analysis of the code and Report Generation
  • Support for hardware unit design as per ISO 26262 standard
  • ISO 26262 complaint unit, integration and functional testing using tools like CANTATA, RTRT, Tessy, MX-Suite etc.
  • Automotive software/hardware development as latest Cybersecurity standard- ISO/SAE 21434
  • Support for safety analysis activities (FMEA, FMEDA, DFA, FTA) for ISO 26262 complaint solution development


Our Hardware Related Compliance Services:

  • CISPR, ISO/IEC compliant hardware solutions for automotive product development projects
  • Support for entire V-cycle of hardware development- hardware architectural design to hardware validation testing
  • Optimization of BOM cost
  • Hardware schematics
  • PCB Gerber file generation

Inter-ECU and Intra-ECU Com standards

We Provide a Library of Automotive Protocol Stacks to Expedite Series Production for OEMs and Tier-1 Suppliers.

  • Pre-tested and ready-to-integrate protocol stacks to enable inter-ECU communication
  • Stacks are developed as per CMMI Level 3 and ISO9001:2008 guidelines
  • Coding guidelines conform to MISRA C
  • Proprietary tools for CAN, LIN configuration as per CAN Matrix or LDF file.

More standards soon! Watch this space.